License Management [ULTIMATE]
Introduced in GitLab Ultimate 11.0.
Overview
If you are using GitLab CI/CD, you can search your project dependencies for their licenses using License Management.
You can take advantage of License Management by either including the job
in your existing .gitlab-ci.yml file or by implicitly using
Auto License Management
that is provided by Auto DevOps.
GitLab checks the License Management report, compares the licenses between the
source and target branches, and shows the information right on the merge request.
Blacklisted licenses will be clearly visible with an x red icon next to them
as well as new licenses which need a decision from you. In addition, you can
manually approve or blacklist
licenses in your project's settings.
NOTE: Note:
If the license management report doesn't have anything to compare to, no information
will be displayed in the merge request area. That is the case when you add the
license_management job in your .gitlab-ci.yml for the first time.
Consecutive merge requests will have something to compare to and the license
management report will be shown properly.

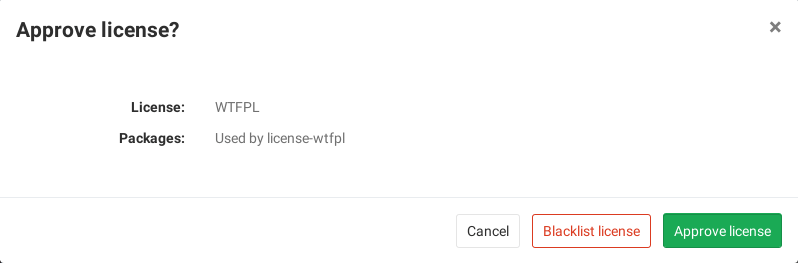
If you are a project or group Maintainer, you can click on a license to be given the choice to approve it or blacklist it.
Use cases
It helps you find what licenses your project uses in its dependencies, and decide for each of then whether to allow it or forbid it. For example, your application is using an external (open source) library whose license is incompatible with yours.
Supported languages and package managers
The following languages and package managers are supported.
| Language | Package managers | Scan Tool |
|---|---|---|
| JavaScript | Bower, npm | License Finder |
| Go | Godep, go get | License Finder |
| Java | Gradle, Maven | License Finder |
| .NET | Nuget | License Finder |
| Python | pip | License Finder |
| Ruby | gem | License Finder |
Requirements
To run a License Management scanning job, you need GitLab Runner with the
docker executor.
Configuring License Management
To enable License Management in your project, define a job in your .gitlab-ci.yml
file that generates the License Management report artifact.
This can be done in two ways:
- For GitLab 11.9 and later, including the provided
License-Management.gitlab-ci.ymltemplate (recommended). - Manually specifying the job definition. Not recommended unless using GitLab 11.8 and earlier.
The License Management settings can be changed through environment variables by using the
variables parameter in .gitlab-ci.yml. These variables are documented in the License Management documentation.
Including the provided template
NOTE: Note: The CI/CD License Management template is supported on GitLab 11.9 and later versions. For earlier versions, use the manual job definition.
A CI/CD License Management template
with the default License Management job definition is provided as a part of your GitLab
installation which you can include
in your .gitlab-ci.yml file.
To enable License Management using the provided template, add the following to
your .gitlab-ci.yml file:
include:
  template: License-Management.gitlab-ci.yml
The included template will create a license_management job in your CI/CD pipeline
and scan your dependencies to find their licenses.
The report will be saved as a License Management report artifact that you can later download and analyze. Due to implementation limitations, we always take the latest License Management artifact available. Behind the scenes, the GitLab License Management Docker image is used to detect the languages/frameworks and in turn analyzes the licenses.
Installing custom dependencies
Introduced in GitLab Ultimate 11.4.
The license_management image already embeds many auto-detection scripts, languages,
and packages. Nevertheless, it's almost impossible to cover all cases for all projects.
That's why sometimes it's necessary to install extra packages, or to have extra steps
in the project automated setup, like the download and installation of a certificate.
For that, a LICENSE_MANAGEMENT_SETUP_CMD environment variable can be passed to the container,
with the required commands to run before the license detection.
If present, this variable will override the setup step necessary to install all the packages
of your application (e.g.: for a project with a Gemfile, the setup step could be
bundle install).
For example:
include:
  template: License-Management.gitlab-ci.yml

variables:
  LICENSE_MANAGEMENT_SETUP_CMD: sh my-custom-install-script.sh
In this example, my-custom-install-script.sh is a shell script at the root
directory of your project.
Overriding the template
If you want to override the job definition (for example, change properties like
variables or dependencies), you need to declare a license_management job
after the template inclusion and specify any additional keys under it. For example:
include:
  template: License-Management.gitlab-ci.yml

license_management:
  variables:
    CI_DEBUG_TRACE: "true"
Configuring Maven projects
The License Management tool provides a MAVEN_CLI_OPTS environment variable which can hold
the command line arguments to pass to the mvn install command which is executed under the hood.
Feel free to use it for the customization of Maven execution. For example:
include:
  template: License-Management.gitlab-ci.yml

license_management:
  variables:
    MAVEN_CLI_OPTS: --debug
mvn install runs through all of the build life cycle
stages prior to install, including test. Running unit tests is not directly
necessary for the license scanning purposes and consumes time, so it's skipped
by having the default value of MAVEN_CLI_OPTS as -DskipTests. If you want
to supply custom MAVEN_CLI_OPTS and skip tests at the same time, don't forget
to explicitly add -DskipTests to your options.
If you still need to run tests during mvn install, add -DskipTests=false to
MAVEN_CLI_OPTS.
Selecting the version of Python
Introduced in GitLab Ultimate 12.0.
License Management uses Python 2.7 and pip 10.0 by default.
If your project requires Python 3, you can switch to Python 3.5 and pip 19.1
by setting the LM_PYTHON_VERSION environment variable to 3.
include:
  template: License-Management.gitlab-ci.yml

license_management:
  variables:
    LM_PYTHON_VERSION: 3
Manual job definition for GitLab 11.5 and later
For GitLab 11.5 and GitLab Runner 11.5 and later, the following license_management
job can be added:
license_management:
  image:
    name: "registry.gitlab.com/gitlab-org/security-products/license-management:$CI_SERVER_VERSION_MAJOR-$CI_SERVER_VERSION_MINOR-stable"
    entrypoint: [""]
  stage: test
  allow_failure: true
  script:
    - /run.sh analyze .
  artifacts:
    reports:
      license_management: gl-license-management-report.json
If you want to install custom project dependencies via the SETUP_CMD variable:
license_management:
  image:
    name: "registry.gitlab.com/gitlab-org/security-products/license-management:$CI_SERVER_VERSION_MAJOR-$CI_SERVER_VERSION_MINOR-stable"
    entrypoint: [""]
  stage: test
  variables:
    SETUP_CMD: ./my-custom-install-script.sh
  allow_failure: true
  script:
    - /run.sh analyze .
  artifacts:
    reports:
      license_management: gl-license-management-report.json
Manual job definition for GitLab 11.4 and earlier (deprecated)
CAUTION: Caution:
Before GitLab 11.5, the License Management job and artifact had to be named specifically
to automatically extract the report data and show it in the merge request widget.
While these old job definitions are still maintained, they have been deprecated
and may be removed in the next major release, GitLab 12.0. You are strongly advised
to update your current .gitlab-ci.yml configuration to reflect that change.
For GitLab 11.4 and earlier, the job should look like:
license_management:
  image:
    name: "registry.gitlab.com/gitlab-org/security-products/license-management:$CI_SERVER_VERSION_MAJOR-$CI_SERVER_VERSION_MINOR-stable"
    entrypoint: [""]
  stage: test
  allow_failure: true
  script:
    - /run.sh analyze .
  artifacts:
    paths: [gl-license-management-report.json]
Project policies for License Management
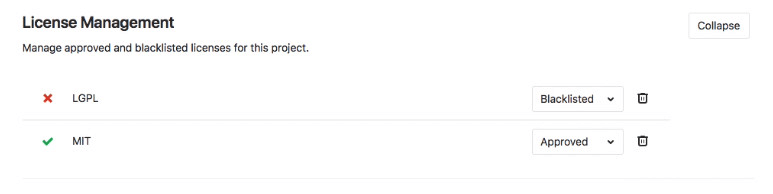
Introduced in GitLab Ultimate 11.4.
From the project's settings:
- The list of licenses and their status can be managed.
- Licenses can be manually approved or blacklisted.
To approve or blacklist a license:
-
Either use the Manage licenses button in the merge request widget, or navigate to the project's Settings > CI/CD and expand the License Management section.
-
Click the Add a license button.
-
In the License name dropdown, either:
- Select one of the available licenses. You can search for licenses in the field at the top of the list.
- Enter arbitrary text in the field at the top of the list. This will cause the text to be added as a license name to the list.
-
Select the Approve or Blacklist radio button to approve or blacklist respectively the selected license.

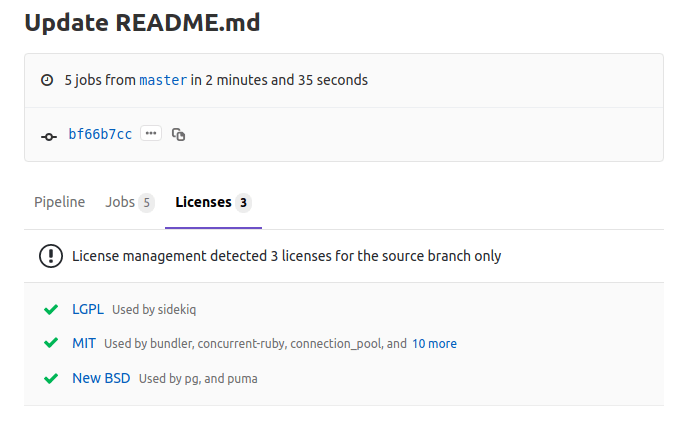
License Management report under pipelines
Introduced in GitLab Ultimate 11.2.
From your project's left sidebar, navigate to CI/CD > Pipelines and click on the
pipeline ID that has a license_management job to see the Licenses tab with the listed
licenses (if any).